Author: Elma Dilaver Gheith
Viewers: 1,223
Last month viewers: 10
Categories: PHP Tutorials, Sponsored
If you have to emit many invoices to your customers, it quickly becomes a tedious task that you would like to automate as much as possible.
Read this tutorial article to learn how you can quickly create invoices for your customers and be paid as fast as possible using Invoicely free service.
Introduction
Generating your own invoices to bill your customers is not hard but it is usually not a fun job, especially when you need to do that repeatedly to get paid.
This is something that the Invoicely online application can help you. Your invoices and estimates can be written in any language and you can set the money amounts in any currency, so you will not have any limitations regardless where your clients are. Automatic payment reminders also help your customers to not forget to pay.
This article is a tutorial to tell about useful Invoicely features and how you can use them in practice to serve your purposes.

How to start
To start with Invoicely, obviously first you have to register in the site. After adding your personal information, you can choose between three different plans (basic, professional and enterprise) for which you would pay monthly. It is possible to skip this step because Invoicely is available for free for those that do not want to use the more advanced features.
Besides the price, the biggest difference between the three plans is the number of team members, which can use your Invoicely plan.
The last step during the registration is providing information about the business to setup. Here you can provide information like business name and create your vanity URL, but instead of providing business name, you can also choose to proceed as an individual, in which case you don't need to provide any business name.
By clicking on "Start using invoicely“ your registration process is completed and you can start creating your first invoice.
To see all the possibilities you get with the plan, you have chosen, click on the logo and business name on the left upper corner. If you choose the free plan, it is not possible to share the account with other team members, which is why this plan is ideal if you work as an individual.
With the free plan, you can still create unlimited number of invoices for an unlimited number of clients and keep track of 100 saved items at the same time. The advantage of the other three plans are additional possibilities like online payments, custom emails and more.
On the left side, you can find a menu bar, where the features are listed separately, like: Dashboard, Reports, Invoices, Bills, Estimates, Track, Clients, Business Settings. Even with the free plan, you can use all of the features, except Estimates and Track, which require an upgrade to at least the Basic Plan.
Create Your First Invoice
To create the first invoice, you can go to Dashboard, where all your activities are usually listed. Since you have not created any invoice yet, you are asked to create the first invoice in the Recent Activity box. To do that, just click on the link "create your first invoice now“.
Another way is to click on the "Invoices“ in the left menu and than to click on the "Add New“ in the right upper corner, where you choose to create an invoice or a recurring invoice. If you click on "Invoice“, a draft is going to open with your personal information are already filled there.
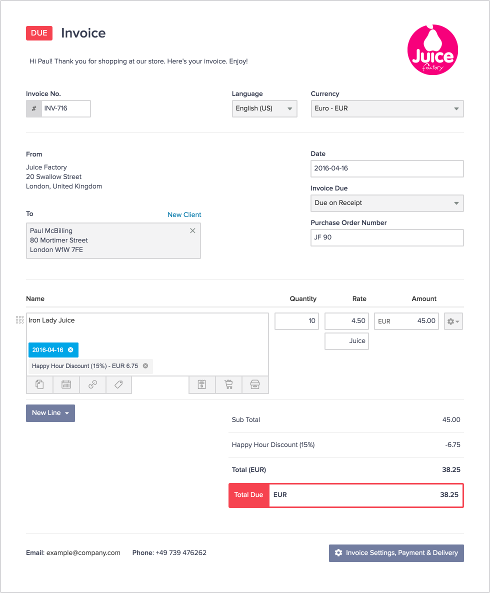
You still have to add a description, choose the language and currency, add the client name and the purchase order number, as well information about the item like a description, quantity, rate with unit and amount. You also have to set the date and the invoice due.
Besides the basic information, you can also add a new line for additional information about another item, expense, mileage or time. Before finishing the invoice, you can also add an invoice note. To customize the invoice to the brand of your business, add your own logo by clicking on the upper right corner of the draft, where you logo will be.
You will see that you can do even more than just uploading your company logo. You can also choose between different colors as primary and secundary colors and also choose colors for buttons as primary and secondary button color.
You can also change between different languages here and also specify statements, notes, email notifications, automatic reminders and notifications as well as administrator reminders and notifications. This way, yor invoices will be perfectly individualized for your business purposes.
For saving and sending the new invoice, you have to add also the information about the client like name, currency, language, email address, phone number and so on. These information will be saved for the next time, you choose to send another invoice to the same client.
In order to add this information, click on the link „New Client“ above the clients name/company name you added on the draft as the receiver of the invoice. After sending the invoice to the client, you can take a look at the invoice and find the information about it on „Invoices“.
To change the status and execute other actions regarding the invoice, you just have to open it again and click on „Actions“ in the right upper corner. Here you can mark the invoice as paid, download it as PDF, duplicate it and much more.

Create Your First Bill
To create your first bill, you have to click on „Bills“ on the left menu and on „Add New“ on the right upper corner. You can choose to create a bill or a recurring bill. After choosing to create a bill, you get a draft, like when you created the first invoice.
Again, you can add a description, choose a language and currency, choose a client already saved or add a new one and provide basic information about item(s), expense, mileage or time needed for a task.
Like in the draft of an invoice, here you can also individualize the bill, adding a logo, colors and more. After saving the bill, you can find it on „Bills“, where you can keep track on the status. To execute any actions regarding the bill, you have to open it and click on „Actions“ in the right upper corner, where you can change its status, download it, duplicate it and much more.
Using the Dashboard
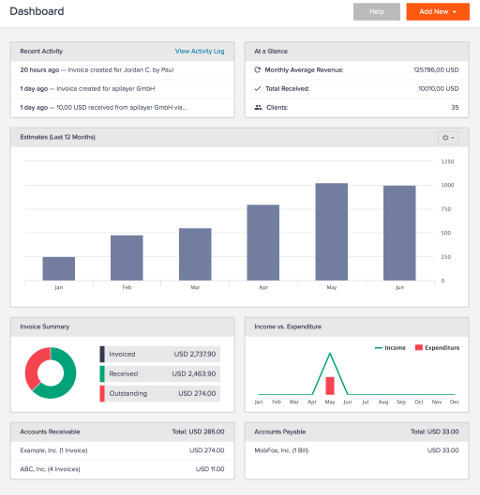
On the Dashboard, you can see all your activities and information about invoices and expenses in charts. This feature gives you the possibility to keep track of the finances and clients at the same time.
It's an overview of all the activities on your Invoicely account. You can choose to see a specific report type in a specific time period on the diagram. At the same, it's a place where you can add new invoices, bills and clients.
For adding new invoices, bills or clients, you have to click on „Add New“ in the right upper corner and choose, what to add. Afterwards you get the needed draft and start creating new invoices/bills.

Generate Reports
A great way to keep track of all the finance details is also the possibility to generate reports. You can download them as PDF, XLS, CSV or TSV. To generate a report, you have to click on „Reports“ in the left menu, where you get the possibility to choose a report type.
Regarding to the report type you choose, the additional information needed appear. For instance, if you choose invoices as report type, you will also have to add period of time, the invoice status and currency as well as all the clients or a single client. After adding all information needed, click on „Generate Report“ and you will find it listed below.
Manage Your Clients
If you go to „Clients“, you will find all your clients listed. That is where you can add new clients and edit information about the existing ones. For adding new client, click on "New Client" in the right upper corner and you will be provided with a form to add all the information about your new client.
Change Account Settings
You can change all the information given about your business. To do that you have to go to „Business Settings“ in the left menu. You can change basic information like business name and vanity URL, as well business information like general preferences, statement preferences, payment integrations, your team, taxes, discounts and shipping, saved items and business customizations.
Here you can also manage your current files and trashed files. Here you can recover or permanently delete trashed files. Besides changing and adding information, you can also choose to delete business information entirely.
Multiple Currencies
Invoicely allows you to bill your customers in multiple currencies. It can convert the amounts into a given currency of your preference, so you can see unified statistics for all the payments you get.
This feature is implemented using the currencylayer.com API, which can perform currency conversions between many currencies and can also look at historical data of the currency values at past dates.
In the PHP Classes site there is at least one class that can take advantage of this API.
Additional Features
"Estimates" and "Track" are features which can be used only if you take a plan which has to be payed for, like the Basic Plan for example. If you choose to upgrade your plan, you will be able to accept payments, include multiple team members, track your time, expenses and mileage, to take advantage of advanced business branding and more.
Even though the free plan is great for a single individual or a very small business, the plans you have to pay for have advantages which you will appreciate if your business is growing. Therefore you can upgrade your Invoicely account any time, if you feel the need for additional features and more flexibility.
Create Estimates
Creating estimates and sending them to the client is sometimes a secure way to negotiate with the client in advance, before sending an invoice, or just to make sure that no misunderstandings will appear during actual payments. Using Invoicely, you can easily turn estimates into invoices and don't have to create them separately.
Receive Online Payments
Using a variety of payment methods, you can receive online payments in any currency. Again, this feature is only possible if you choose at least the Basic Plan.
Track your time, expenses and mileage
To assure you get the right compensation for all your work, you can convert hours, expenses and miles into invoices and bills. For that purpose, you can track time easily while working on a task and after the task is done, simply convert the time needed to an invoice.
Besides time, it is also important to keep track of all the expenses along the way to stay organized, which becomes simple using Invoicely. Besides drinks or lunch with the client, you should also keep track on miles while traveling for business purposes. Keeping track of mileage and expenses keeps it easy to bill them afterwards to the client.
Manage Multiple Businesses
Thanks to the possibility of managing multiple businesses on Invoicely, making business even after your business grows and keeping track of all the finances stays simple. This also means that you will be able to add staff team members and to set permisions based on the function of each member.
You will be capable of setting different languages and currencies for each client individually, why making business stays flexible and organized at the same time.
Conclusion
If you are an individual, who wants to start business and does not want to loose precious time creating complicated invoices, bills and trying to keep track of all the finances, Invoicely is of a great help for you.
If your business is already successful and growing rapidly, than keeping track of clients, businesses and finances becomes even more complicated. Invoicely is a place, where all of this becomes simple and clearly arranged.
The free plan is enough for small businesses and individuals, but for growing or already large businesses, there are additional features in other plans, which cost a certain amount of money monthly, but enable the access to more possibilities and flexibility during making business.
If you liked this article, please share it with other developers that may need an invoicing service like this. Post a comment if you have other questions about Invoicely features.
You need to be a registered user or login to post a comment
Login Immediately with your account on:
Comments:
No comments were submitted yet.


